Wooden Bow-Tie

Finished Tie
fig. 1: A hasty tie

Christmas party at work, and someone had the idea of all the guys wearing a bow tie on that day.  I only have two ties, and neither of them bows, so I figured I’d either stop at Goodwill before then for one, or come up with a solution of my own to this tie problem.

Welp, the night before, I still have no bow tie.  So I got online and google “how to make a bow tie”.  I’ve got some fabric scraps around, and I could come up with something.  However, much to my delight, I see that there are some hipsters who have come up with the idea of making a tie out of wood.  Much easier for me to make a wood tie than a fabric tie.

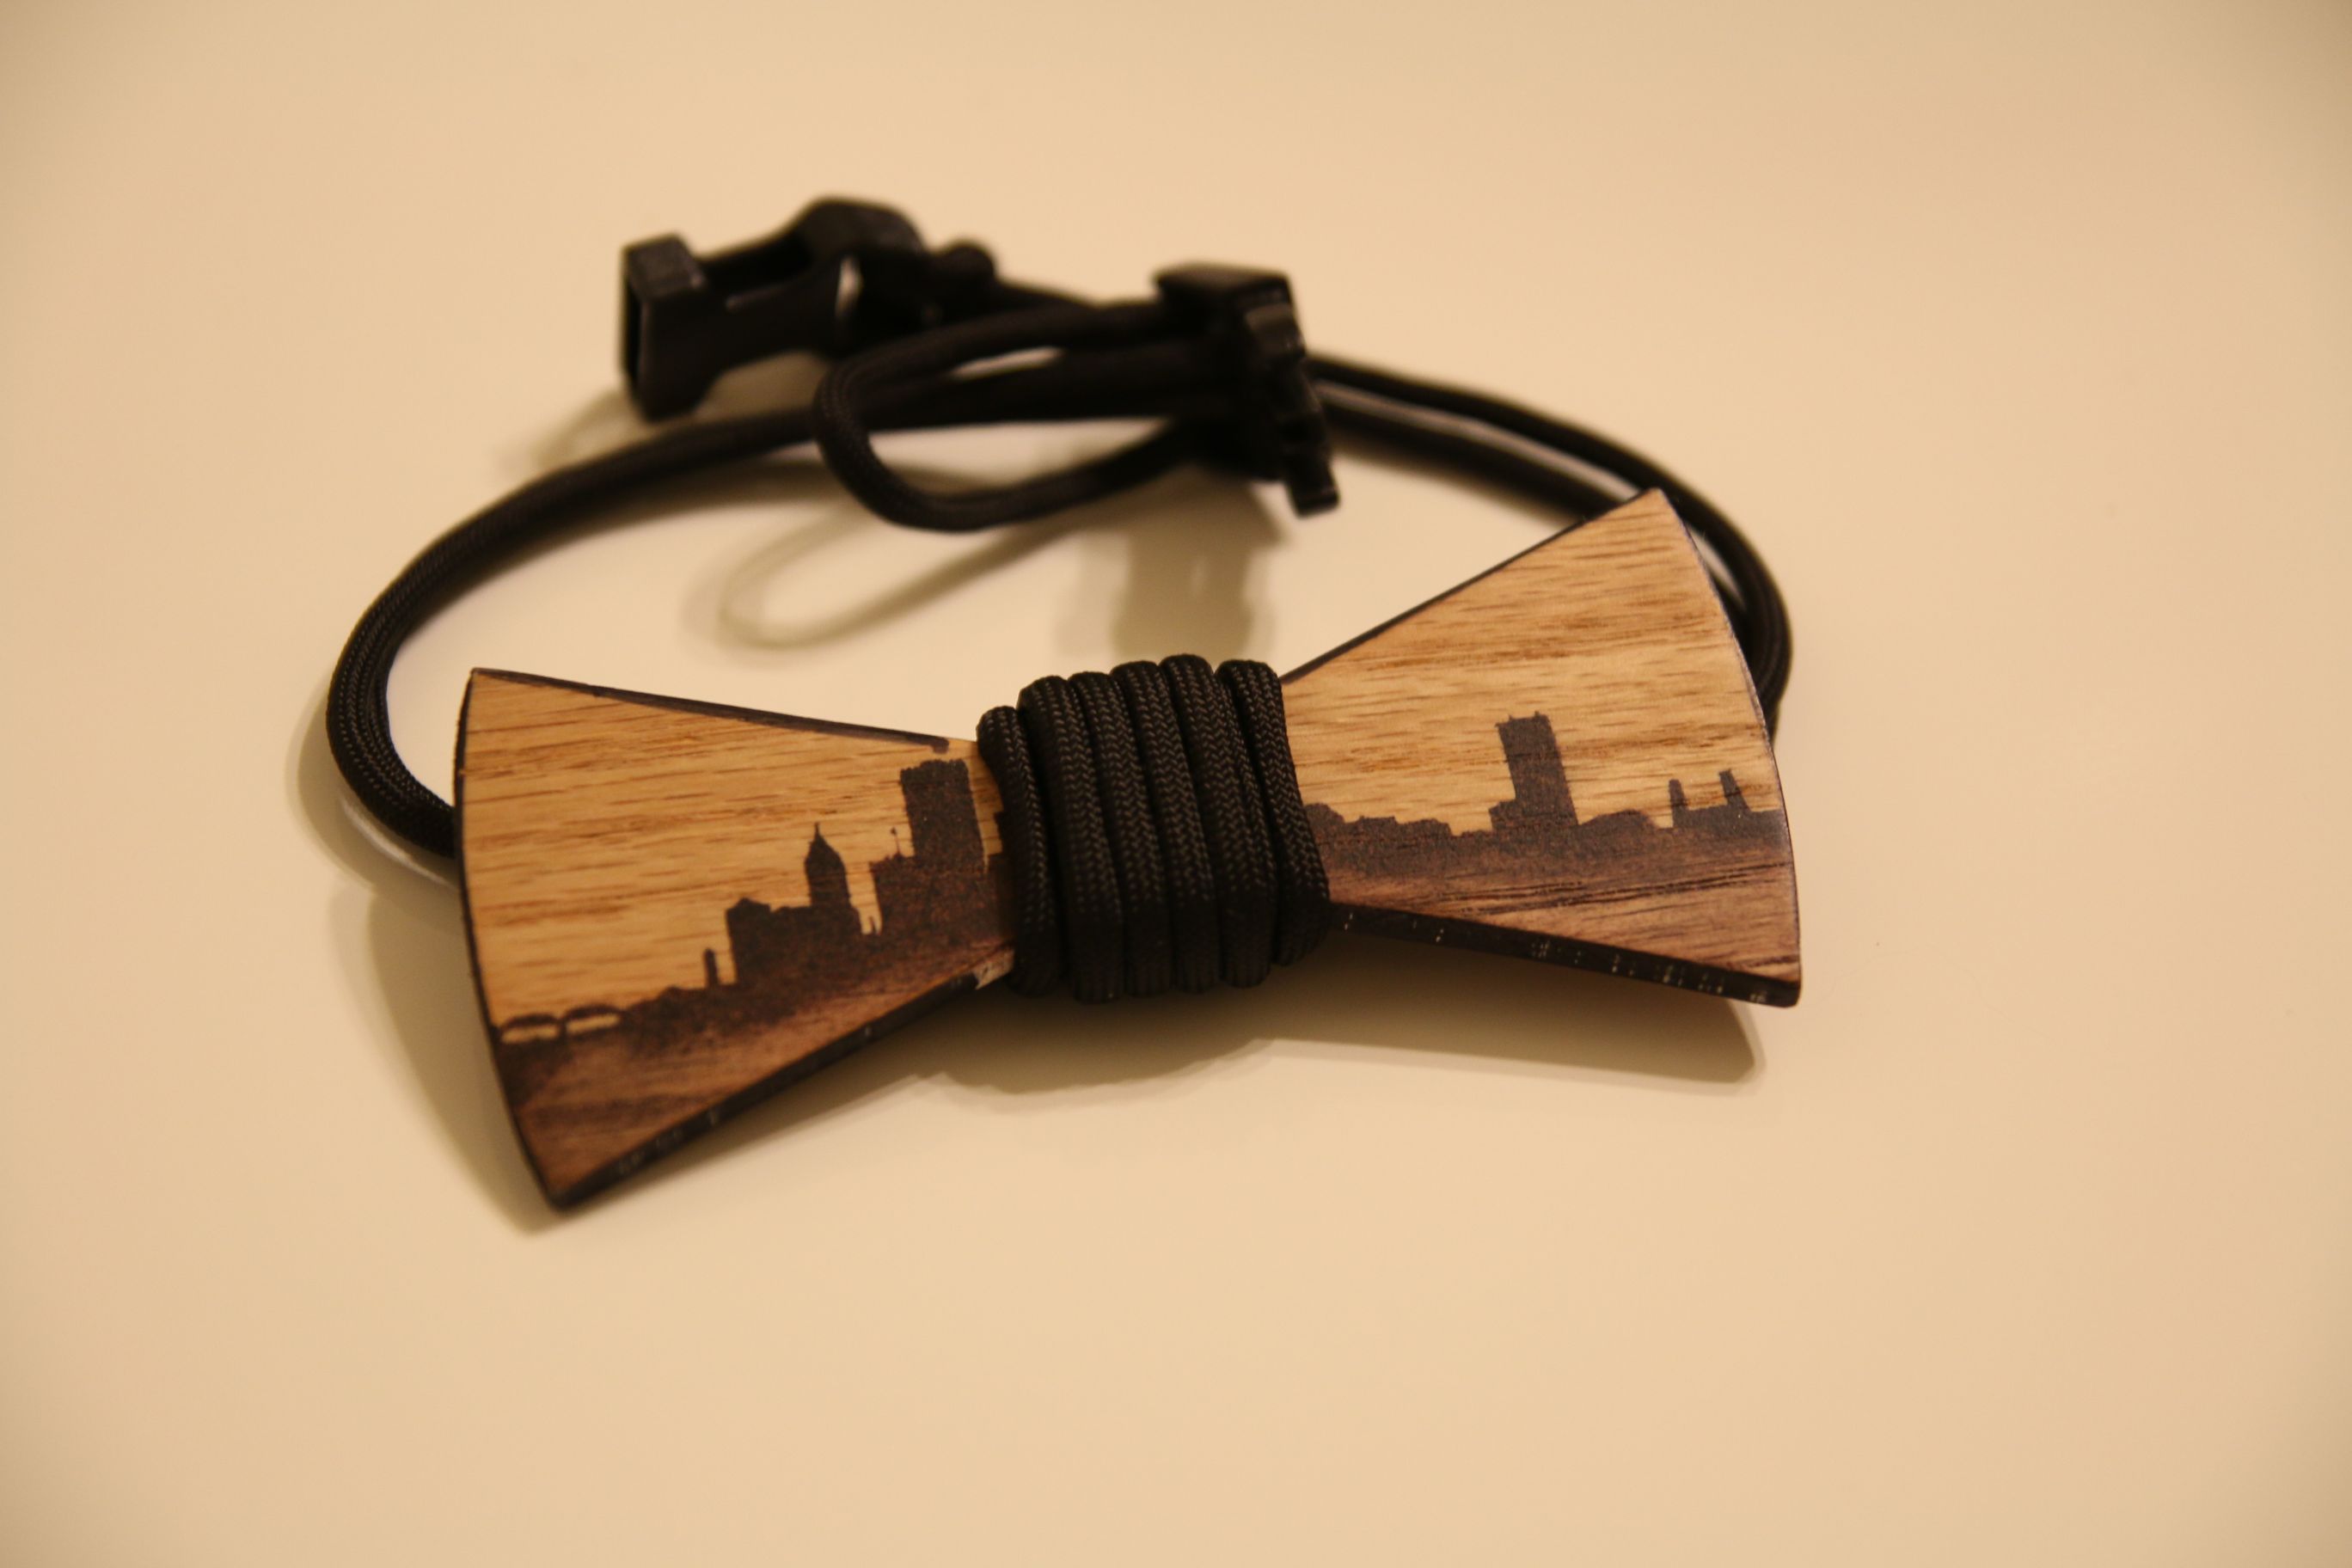
Since I don’t have an actual tie to work with, I need to find out what the dimensions of a bow tie are (fun fact: 4.5″ x 1.75″).  Sketched out  a bow-tie shape in Illustrator, then overlaid a stylized silhouette of Portland from Google image search.  Sent the pattern to my Silhouette, pulled a thin piece of oak ply out of the scrap bin, then cut the pattern out on the band saw.

Rattle-can of black paint over the stencil, and then a light wash of wood stain.  I noticed that the wood stain started smearing the rattle-can paint, so I used that effect to have the city fade out at the bottom.  The edges of the ply are pretty light, so I used a sharpie around the outside edge.  Finish it off with a light spray of matte clear coat, and the hard part is done.

Found a scrap of black paracord I haven’t found a use for yet, wrapped it around the middle, and then put some side-release buckles on the ends.  All done!

Got plenty of compliments at work about the tie, and it did look pretty alright.  But with the party over, I don’t really have a good use for the tie.  I thought about just pitching it back into the scrap bin, but I found a better use for it: The Collar of Shame.

IMG_1147
fig 2: One (1) disobedient cat experiencing everlasting shame

Lisa’s Geological Specimen Box

DSCN3895

When Christmastime was rolling around, I had some gifts (almost all of them, I guess) that would require access to Schenk’s laser cutter.  But then he was called out of town at the last minute.  Oh no!  Fortunately, his wife was kind enough to allow me to stop by and finish my gifts in time for Christmas.  When I was walking out the door with my arms loaded with gift parts, I told her that I would design her something worthwhile.

The BPAL Box for Isaac’s wife Cyl.  The Needlepoint Box for Pete’s Wife Sarah.  I decided to continue the tradition of box-making tailored to the recipients specific hobby.  Something that makes them unique.  For their wedding centerpieces last year, Lisa deployed some of her finest mineralogical specimens to support the rustic, natural theme of their reception.  But visiting their home a few months later, I saw some of them in a bucket.  That just won’t do.

DSCN3900I doodled a couple ideas for what I wanted the box to look like.  I knew I wanted shallow sample trays, so each specimen would be easily visible and accessible.  I wanted doors on the front so that the trays wouldn’t slide out during transport.  If the doors were deep enough, I could make space for smaller containers for sands, soils, and agates, along with specimen maintenance tools like brushes and loupes.

Withe dimensions roughed out on paper, I translated the design into Sketchup so that I could get some hard numbers.

I didn’t want visible screws, so this box marked my foray into plate-joinery.  I received a plate joiner as a gift last year, but haven’t had an opportunity to use it.  The box was going to have rocks in it, and I didn’t want it coming apart when moving it.

DSCN3904The carcase is made of 1/2″ sandeply joined with biscuits, and the trays are Poplar fronts with 1/4″ MDF joined using my 17-gauge pin nailer.  After assembling the third tray, I finally got the idea that the MDF wouldn’t split if I pinned it closer to the middle of the boards.  Better late than never.  I didn’t trust myself notching all the tray dividers on the table saw, so it was a perfect job for the laser cutter.

Each tray got a wipe-down of paste wax on the bottoms and sides for a smooth ride in and out of the box.  The drawers fit so snugly that they give a little owl “hoot” when pushing them back in; the escaping air has to pass over the tops of the sample compartments, in effect creating a type of whistle.

Brass hardware keeps everything together.  Even though I wanted to use nickel hardware, I was kind of forced to use brass hardware since I couldn’t find the handles I wanted in nickel.  Lisa’s keeps the collection secure with an antique brass lock.

DSCN3903The box was finished with Dark Walnut stain and two layers of semi-gloss poly.  Before applying the poly, I cut out stencils on the Cameo for each side of the box and applied a quick spray of rattlecan white.

For maximum personalization, I created a name plate so that there would be no question or confusion as to who owned the box, and what was inside.

Lessons Learned

When working with plywood, if I’m making something nice as a gift, I need to either apply edge banding to the exposed plywood edge, or paint the whole box.  I finish the plywood surface because I wanted to give a ‘finished wood’ look, but the exposed ply edges really take away from the whole aesthetic.

Also, I got to use my plate joiner for a practical project, which was fairly easy and fun.

A Cork Box for Corks

I have an Aunt and Uncle that like wine and preparing gourmet food, and when I was at their place for Thanksgiving I noticed bags of corks.  Before Christmas, I told them that if they brought some corks for me, I would make it worth their while.

IMG_2709I picked up a plain black top-loading shadowbox at Michaels, as it was easier to just pay for one outright as opposed to having to building one from scratch (mostly didn’t want to deal with the glass cutting; plus, they’re really affordable).  I designed a logo that featured their name and their wedding year, along with their initials on the glasses.

Lessons Learned
The original plan was to cut the artwork out on the Cameo, then use some etching cream so the design would be etched in the glass.  However, I wasn’t thinking when I started weeding the contact paper and accidentally ‘inverted’ the design; the white parts of the logo would be clear, and all the parts around would be etched.  Eh, it’ll still work out.

I applied the cream, let it set for a pretty long time, then rinsed it off.  To my dismay, the etching was awful and splotchy.  I applied more cream to the bad parts, but to no avail.  I later learned that the cream isn’t good for etching large areas at once, as differences in the glass composition react to the cream differently.  The cream is much better used for stencil work.

Grabbed a new box (as I said, they’re affordable), and decided just to settle on using vinyl.  It looks pretty good, plus the white will contrast nicely over the corks when it starts to fill up.

Mackie’s Pendant

Decided to memorialize the fall of a fiend’s fallen comrade with a small piece of jewelry.  Up until now, everything I have lased has been purely vector format, so this marks my first foray into grey-scale imagery.

IMG_2710MSRaynsford had a series of articles where he was experimenting with reproducing grey-scale using a combination of power setting adjustments and halftone conversions for the photos.

I just went halftone, and adjusted the power, speed, and focusing distance until I was getting good blacks on the wood.

I went with MDF because it’s a uniform composition of wood; there’s no grain that will take different amounts of burning.  Plus the etching blows out the surface of the wood, so there’s no use in wasting wood with grain to it.

The final cut pass was generated by expanding the path around the photo, and came out with sharper corners than I anticipated.  I would have rounded them down with sandpaper, but then the parts I sanded down would be light exposed MDF contrasting with the blackened MDF generated after the cut pass.

Grabbed a fine silver (looking) chain from Michael’s, and it made for a fine memorial gift.

Lessons Learned
How to etch in grey-scale with a laser.

Christmas Boxes for Aunt Gloria

At thanksgiving, I drew my Aunt Gloria’s name out of the bowl for our family’s secret-santa.  Decided on making a pair of small boxes.

IMG_2705The bodies of the boxes are miter-joined Maple with Oak keys on the side edges.  The lids are a miter-joined Oak frame with 1/8″ laser-cut plywood set in a slot in the frame.

The box on the left is laser-cut all the way through.  It features my aunt and uncle’s name around a monogrammed initial, and is intended to be a potpourri box (I included a bag of potpourri to drive that point home).  The box on the right is etched with just my aunt’s name, and is intended to be just a keepsake or jewelry box.

Lessons Learned:
I should have used a darker contrasting wood for the keys, like Walnut or Purple Heart.  I was hoping the Oak wood would absorb more of the darker stain.  Also, some of the filigree work on the potpourri lid is alarmingly thin.  A couple small pieces broke off, and I had to break off the mirrored pieces to retain a symmetrical look.  The filigrees look like they just touch the lid frame, but they extend to a sturdy rectangular piece that runs around the entire inside of the slot it fits in, so the majority of it is surprisingly sturdy.

Marti Family Kitchens Logo

I was set on making a cutting board for my brother for Christmas, but I didn’t really know what I wanted to personalize with it.

IMG_3272
fig 1: click for logo embiggening

After futzing around for an hour or two, I finally decided on this design. I liked the look of it, so test it out I decided to send it to my Cameo.  I cut it out of plain white contact paper and adhered it to my microwave door. The contact paper is sticky enough to survive wipedowns with a sponge, but it would be easy to remove someday in the event I had to move.

A Needlepoint Project Box

IMG_0304aMy friend Sarah enjoys knitting and needlepoint in her spare time.  I noticed she kept her thread cards in one container, her scissors and pins in her sewing kit, and hoops and projects elsewhere.  Wouldn’t it be nice, I thought, if she could keep all her needlepoint-related projects in one place?

When I sketched up the plans, I knew that I wanted to have a partitioned area to keep the little plastic ‘cards’ of thread, an area for miscellaneous supplies (I think sewing enthusiasts call these items ‘notions’), an area for the ‘skeins’ of thread waiting to be put on the cards (not sure of the technical term for those), and an area for hoops when they aren’t in use.

IMG_0302At first, I was going to have just one box with a lift-out tray.  But I wanted to have three separate compartments.  I figured I would put a drawer in the bottom for large, infrequently-used items, the lift-out tray for frequently used items, and the main bottom compartment for moderately sized, moderately-used items.

Instead of going with the lift-out tray, I decided to go with a fold-out style box, which I figured would be a bit more elegant and just as functional.

The box is made from Poplar with miter keys made from Purple Heart.  The lid is Purple Heart with a Poplar Frame.  I didn’t have a wide enough piece of Purple Heart for the lid, so I got to do my first book-matching rip on the table saw, and it turned out great.

IMG_0301To keep her mother-in-law (another needlepointer) from purloining the box, I burned Sarah’s full name deep into the lid using a Scrabble™ tile font I found online.  It’ll take a lot of belt sanding to get that name off the box.

IMG_0306a
Click to embiggen.

The lid is retained in an almost-upright position by a black chain on the right-hand side.  Since the lid is a little wider than 11.5″, I took a couple of scrap pieces of Purple Heart and used them as standoffs for a piece of Lexan.  That way, Sarah can keep needlepoint patterns with her projects.


Lessons Learned:In hindsight, I really wish I spent more time on getting the drawer flush with the front.  It looks fine head-on, but it sticks out a bit on the profile shot.

Fallout AER-9 Laser Combat Rifle

IMG_1829Going along the theme of the Dalek-Human Hybrid Tommygun I made for Pete last year, I decided to make yet another gun for him.  Only this one will hopefully be a little more recognizable to a wider audience.

20131112_035314All my work up until now has been pretty much wood only.  However, I wanted to work on a project that had small, curved details that would be so much easier to do if I used plastic, e.g. the front and back ends of the barrel, and the fore grip.

Fortunately, I’m not the first person to make an AER-9, so I had the luxury of standing on the shoulders of giants.  Notably Volpin Props, who meticulously detailed every step of the construction of his own rifle.

20131112_035245Schenk was out of town for work, so I didn’t have access to the laser cutter.  I had to cut out all the tiny pieces by hand.  I also used spray adhesive to fasten a printout of the gun stock to a sheet of MDF, and then cut it out on the bandsaw.  I guess this is how cavemen used to do it in ancient times?

20131114_033744I used a liberal amountof spot-putty on the project.  It’s great for smoothing over seams and gaps, and sands super smooth. I also used a special type of ‘filler’ spray paint on the stock part of the rifle.  The MDF acts like a sponge when painting, and I wanted a smooth metallic look on the finished product.  I didn’t see that happening on the edge surfaces of the MDF.

20131116_051813I also picked up a product called Magic Sculpt from TAP Plastics here in town, which is a handy two-part epoxy clay.  I was able to mold it to the part where the power cell attaches to the barrel, and it dries as hard as you would expect epoxy to.  It’s kind of expensive, but because it’s a two-part mix, I wind up using less of it than I’d expect.  The two Play-Doh sized containers I got will probably last me a decade.

The power cell gave me a good reason to visit the grandparents.  Grandpa got a lathe as a retirement gift long ago, and hasn’t seen much use lately.  Also, the only other people I know with lathes have metal lathes.  Anyway, modeled up the power cell in Solidworks and printed it out 1:1 scale.  I could then use calipers to compare what I had spinning on the lathe to what I wanted to have spinning on the lathe.

The bottom support rod was made from dowels that I drilled out and chained one to another.  In hindsight, I probably should have just carved the whole thing out on the lathe in one piece.  It would have been a lot more sturdy, should the gun come down hard on something.

20131118_033447I saw a few ideas online for the top tube of the rifle.  One person used steel tubing, another used an acrylic rod.  While walking through Home Depot, I realized I could just use Pex.  Pex is a modern plastic tubing used in houses for water pipes.  It’s fairly bendy, so you don’t have to wrestle around with elbows and couplers during house construction like you have to for copper pipe.  A zap from the heat gun, and it retained its new shape fairly well.

I’ll be sure to update this post in the future when I get pics of the finished gun showing the decals and weathering.


Skyrim Coasters

My friend Nate loves Skyrim.  I remember him excitedly showing me the trailer for it months before it came out, and he played the hell out of it after it came out.  Before X-mas time, I trolled the net for some Skyrim gift ideas, and came across a set of Skyrim-themed coasters.  That would make a great gift.

IMG_3240Each coaster is 3mm ply with a city logo from six of the nine major cities laser-etched into the surface.  I cut circles from a thin self-adhesive cork sheet and stuck them to the bottoms.  I applied wipe-on polyurethane to the surface (making sure not to get any down into the logo area), then washed the logos with an assortment of thinned acrylic paint; the excess acrylic was then easily wiped off the poly’d surface of the coaster.

IMG_3243
fig 2: example of foreground depth-of-field misjudgement

I didn’t think six tiny coasters would make an impressive gift, so I decided to double-down and create another six coasters.  In Skyrim, spells are learned by finding ancient engravings etched in stone.  I wanted to make six more coasters to look like stone tablets engraved with the Dovahkiin translations of six different spells.

Each coaster is laser engraved in 3mm ply, then sprayed with a stone-textured paint.  I did the same thing I did with the city-emblem coasters, only it was very difficult this time because it was hard to wipe away the black acrylic paint from the very rough texture of the coaster.  They still turned out pretty well.  Self-adhesive cork applied to the bottoms protects the surfaces upon which they sit.

IMG_3247

Ghostbusters Proton Pack

20130929_203249I put together a Proton Pack for Halloween.  Fortunately, there are lots of other people online who have done the same, and all the measurements for everything are pretty easily available.  Laser cut the smaller boxy items at the top, hand-cut all the larger items down below.

20131006_035851Wired up a circuit so all the lights flash, just as they do in the movie.

The pack isn’t 100% movie accurate, but I think it’s close enough.  Maybe one day, if I can find one, I’ll replace the large adjustment knob at the top with the genuine Raytheon model crank that they used in the movies.

20131031_203540After I was done with the pack, I also crafted up the trap entirely by hand.

This also marks the first project where I attempted to use dry-brushing to simulate wear.  You can tell on the pack where I kind of started experimenting, and then where I started getting really good at it.

20131026_062156