Dalek-Human Hybrid Gun

IMG_1842Once upon a time, my friend Pete said, “You know… I don’t really give a damn about props, but if I could have one prop, it would be that Dalek machine gun from that one episode of Dr. Who.”  At least, I think that’s what he said.

20130904_042223I managed to find plans online that a clever gentleman created so that he could machine the parts from layers of MDF on his CNC machine.  I converted them into .dxf format so that I could lase them out of thinner layers of MDF and accomplish the same end.  Got them cut out on the laser, except for the pieces that were 1/2″ thick (too thick for speedy cutting on the laser).  I used the laser to quickly draw the pattern on the surface of the wood, then cut it out on the bandsaw.

Bending the MDF around the drum magazine was pretty hair-raising.  I’m just going to throw that out there.

20130905_034625Applied a trusty coat of battleship-gray to the whole thing, except for the grips.  The rear grip turned out really, really well. It was laser-cut birch ply which stained well and looked like actual grips.  The front grip, however, was made from cheap pine, had a poor grain pattern, and didn’t take stain well at all.

20130907_174244
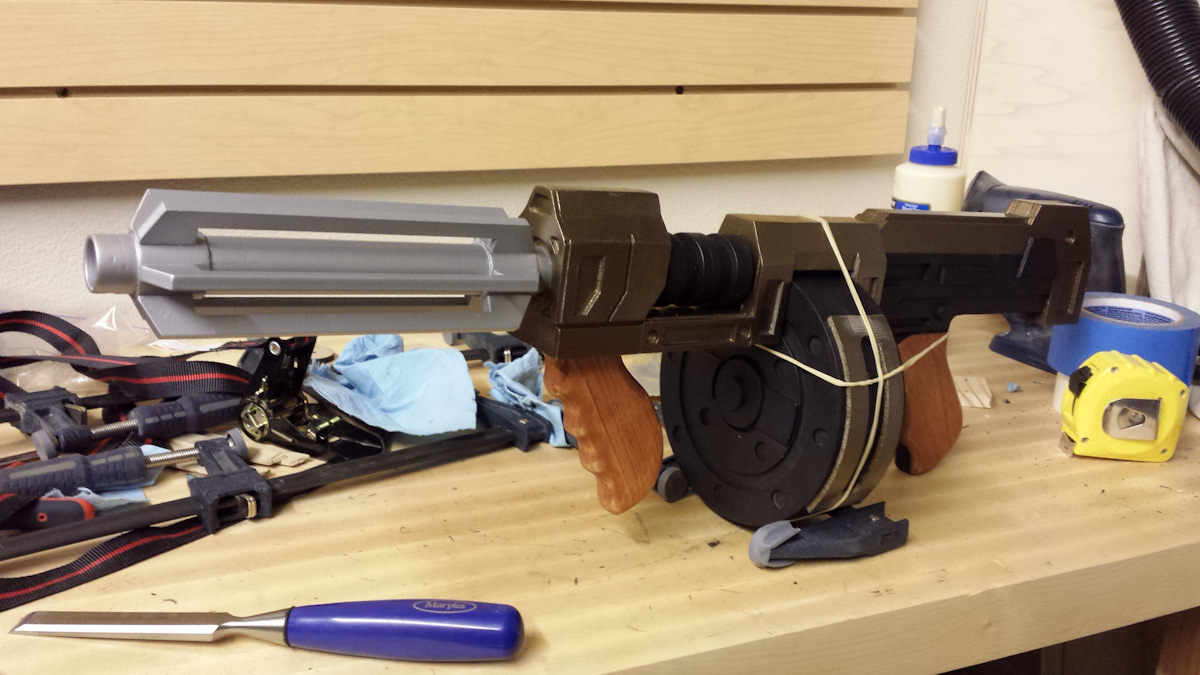
Applied some metallic rattlecan silver and gold for accents over the top of semi-gloss black.  Covered the whole thing with a coat of matte sealer (which would start to flake off weeks later).

Ash Bow (& jig)

A friend roped me into archery as a hobby, and instead of buying a bow, I decided to make my own.

Making the bow was easy enough.  Picked up some ash wood, cut it to shape, and then rasped and sanded down to a smooth draw.  I picked up some actual bowstring string for the bowstring, because why the heck not.

Made up that jig pictured there to show me the curvature of the bow at certain weights.  I’d hook the string on one of the screws, then step back a bit and look to make sure the curve was smooth and even.

Took it out for quite a few test shots.  I’m a terrible marksman, but I was able to get a large majority of the arrows stuck into the bag.

BPAL Scent Index – For Reals

2014-02-10 11.16.46After experimenting on the Proof-of-Concept version of the Scent Index, I got cracking on the final, gift-worthy version.

Instead of the weird, long base piece in the Concept version, I cut it into feet that were screwed onto the outermost pages.  This adds for stability when the whole thing is fanned out, and also the pages don’t scrape on the base, which was a major problem on the Concept.

Had to drill another 150 recessed holes, which, again, took forever.

2014-02-10 11.14.42Ebonized the exterior surfaces of the box using a mixture of steel wool dissolved in white vinegar, brushed over the wood panels that were soaked with a black tea.  I wanted the grain of the Birch ply to show through, but after all was said and done and sealed, you can hardly see it.  I could have saved myself a lot of hassle if I had just rattle-canned the whole thing with semi-gloss black.  After sealing the surface of the wood, I applied silver acrylic into the etched designs.  Helped make them stand out, and the paint wiped cleanly off the surface of the smooth sealed wood.

Used Birch edging to conceal the plywood edges.  That worked out very well.  Also rattlecanned some battleship-grey to the interior, at Cyl’s request.

I cut thin strips of thin craft foam to line each and every recessed hole.  Now the bottles are securely ‘hugged’ when seated all the way down.  You can tip the box onto its side, and all the bottles should stay firmly in place.  Also keeps them secured when opening and closing the Index.

Lessons Learned
I don’t like standing at the drill press for longer than an hour.  Steel wool dissolved in vinegar smells awful and effortlessly stains my workbench.

BPAL Scent Index – Proof of Concept

I have a friend that collects perfumes.  Lots of perfumes.  She showed me a perfume storage box on Etsy she had her eye on, and I thought I would rip off the design wholesale, and give it as a gift.

IMG_1293After creating a copy of Millinginline’s design in Sketchup, I started making modifications to it.  After an hour, I had a design that was all my own.  Millinginline’s design is made for compact ease-of-accessability, and features ‘bonus’ storage for odds and ends.  My design, however, holds standard 5ml bottles only, and would fan all the perfumes out at once.  I dubbed it The Peacock.

Got to work on the proof-of-concept.  It took forever to drill all the recessed holes for the perfumes to sit in, as the thing holds 150 5ml bottles of perfume.  There are two sets of doors on each side that are mirrored copies of each other.  One side of each panel is longer to act as a ‘kickstand’ to keep the box from tipping to the left or right.  Unfolded, the wingspan is pretty impressive.

IMG_1294I also noted that when folded up, there’s an unsightly gap between each ‘page’ of the Scent Index.  Something I’ll need to remedy before making the finished product.

Lookout the Lamp

IMG_1265My brother is the outdoorsy type, and for a few summers he volunteered at fire lookouts here in Oregon.

I found a photo online of a fire lookout that was contrasted nicely against a plain blue sky.  Then I used Illustrator to convert it into a vector image.  Spent some time weeding out the ‘islands’ and the super-narrow parts until I arrived at the finished product, then lased it out of thin plywood.

IMG_1268Usually when  making lamps, I put the diffusion material on the inside.  However, because of the thin, delicate strands of wood holding up the tower, I decided to put diffused plastic on the outside of the lamp to act as a protective ‘shell’.

Like almost all lamps I make, this is outfitted with the guts from a cheap Ikea glass lamp, and a CFL bulb.

Lessons Learned
Even though I used thin plywood and it’s up against the plastic, the silhouette is thick enough that it casts a weird ‘halo’ shadow when the lamp is lit.  I also cut my brother’s name out in the back so that it would project on the wall behind the lamp, but that part doesn’t work.  It just lights up the wall behind the lamp.

Mom’s Keepsake Box

IMG_1282Welp, here it is.  The reason I started woodworking in general.  For Christmas, I wanted to make mom something, so I decided on a jewelry box.  I didn’t like any of the plans I found online, so I decided just to make one from scratch.  Doodled up some blueprints at work, then got down to business.

The box is Cherry with Walnut lid, base, and edge accents.  I routed a very wide groove along the sides to accommodate laser-cut panels glued to the sides.  The oval emblem on the front had two cut passes; the first pass was to cut out the emblem, and the second pass cut out an expanded oval that I could use as a template for the guide bushings on my router.

IMG_1281The lid is a Walnut frame surrounding thin Oak ply with a Rosewood veneer inlay.  I cut out and glued a mirror pane onto the underside of the lid, and added a chain to keep the lid from flopping back too far.

I also lined the inside of the box with navy blue velvet, which I did after I took the picture at the top of the post.

Lessons Learned
There’s a lot of wasted space under the drawer, and the box sits taller than I’d like.  I should have made the Walnut part of the base shorter, and eliminated the gap between the bottom of the drawer and the walnut base.  Maybe making the box wider or deeper would make it feel not so ‘tall’.

I picked up the least-intrusive handle I could find, but in hindsight I probably should have used a dresser-style hanging pull that would have sat more flush with the front of the box.

The Triskelmoon Hoard

IMG_1274I have a friend who is fond of dragons, so for my first foray into box making, I thought I’d make her a dragon-themed box.  I found a sizable assortment of vectorized dragons online and chose a few to use in the project. I also figured that this would be excellent practice for making a keepsake/jewelry box for mom.

The box is made from cheap Pine obtained at Home Depot.  The sides were shaved down to accommodate laser-cut panels that were then glued to the sides and front.

IMG_1278The lid inlay is Walnut veneer glued into a corresponding laser- etch so it sits flush with the lid.  The corner filigree work on the lid is etched, and you can plainly see that the etching is textured where the laser couldn’t quite penetrate the growth rings.

The whole thing was coated with semi-gloss polyurethane, and sanded between coats so that it feels mirror smooth.  I also glued a deep indigo velvet to the inside of the box and the inside of the lift-out tray.

Lessons Learned
How to build a box out of wood.  Using the laser to make veneer inlays.

2014-02-10 11.21.13

Marticade Mame Cabinet

Made long, long ago.  Long before this blog.  Long before I had decent power tools.  Long before the popularity of LCD screens (man, that TV was heavy).

In the interest of fairness, I didn’t make the cabinet from scratch.  I traded a guy on Craigslist my gameboy color and a bunch of games to cut out all the pieces and deliver them.  I painted them up, screwed them together, wired up the panels (with Schenk’s help, since he’s a pro on industrial controls and wiring), and got the computer running. Was a pretty popular item, what with every arcade game ever made.

One of these days, I need to make an updated version with a flatscreen; a narrow version that fits snugly up to a wall.