Saw someone online made an Aperture Science Labs test chamber sign, and figured I could do it too. Cut the graphics out on the vinyl cutter, and applied it to TAP Plastics LED diffusion material, and put plexiglass in front of that (the LED diffusion material is fairly thin). Made a wood box, and burned up a whole five-meter roll of LED tape on the inside.
Problems arose, however, when I figured that a 1A power supply would handle all that LED tape. After about 10 minutes, the power supply got really hot, and I finally did the math and found out that I’d need at the minimum a 3A power supply.
I initially used less LED tape, but the sign is so thin that you could see the gaps between the tape through the diffusion material. In the future, I will probably use a little less tape, then put a sheet of diffusion material directly over the LEDs to help diffuse it a bit before it gets to the front panel.
Built my first drone from kit parts. A XuGong v2 frame with a Naza-m lite flight computer, DJI E305 motors, and the additional gimbal mount for a GoPro.
What drew me to the XuGong frame was the collapsible prop arms. The gimball was pretty nice, too. I see myself more as an explorer or documentarian, so a slower, more stable frame that I could baby would be a better choice for me. If I really want to get into drones as a hobby, then I can pick up a smaller, more agile stunt drone down the road.
This was more of a novelty than a practical tool, but still pretty cool nonetheless. A shelf on drawer runners holds a thin-ish sheet of plastic up to a nichrome wire heating coil up in the top of the box (lined with cementboard and sheet metal for insulation).
When the plastic is heated, it softens up, and the shelf holding the plastic drops down onto the bottom platen, which has a ton of tiny holes. The vacuum pump (under the machine) draws air down through the holes, sucking the plastic sheet down onto whatever is on the platen, creating a ‘shell’ over the object.
The whole machine is a pain to operate, because the nichrome heater requires 220v. I don’t have a 220v outlet out in my garage, and kludging a solution to get it running properly is pretty scary, so it mostly sits unused.
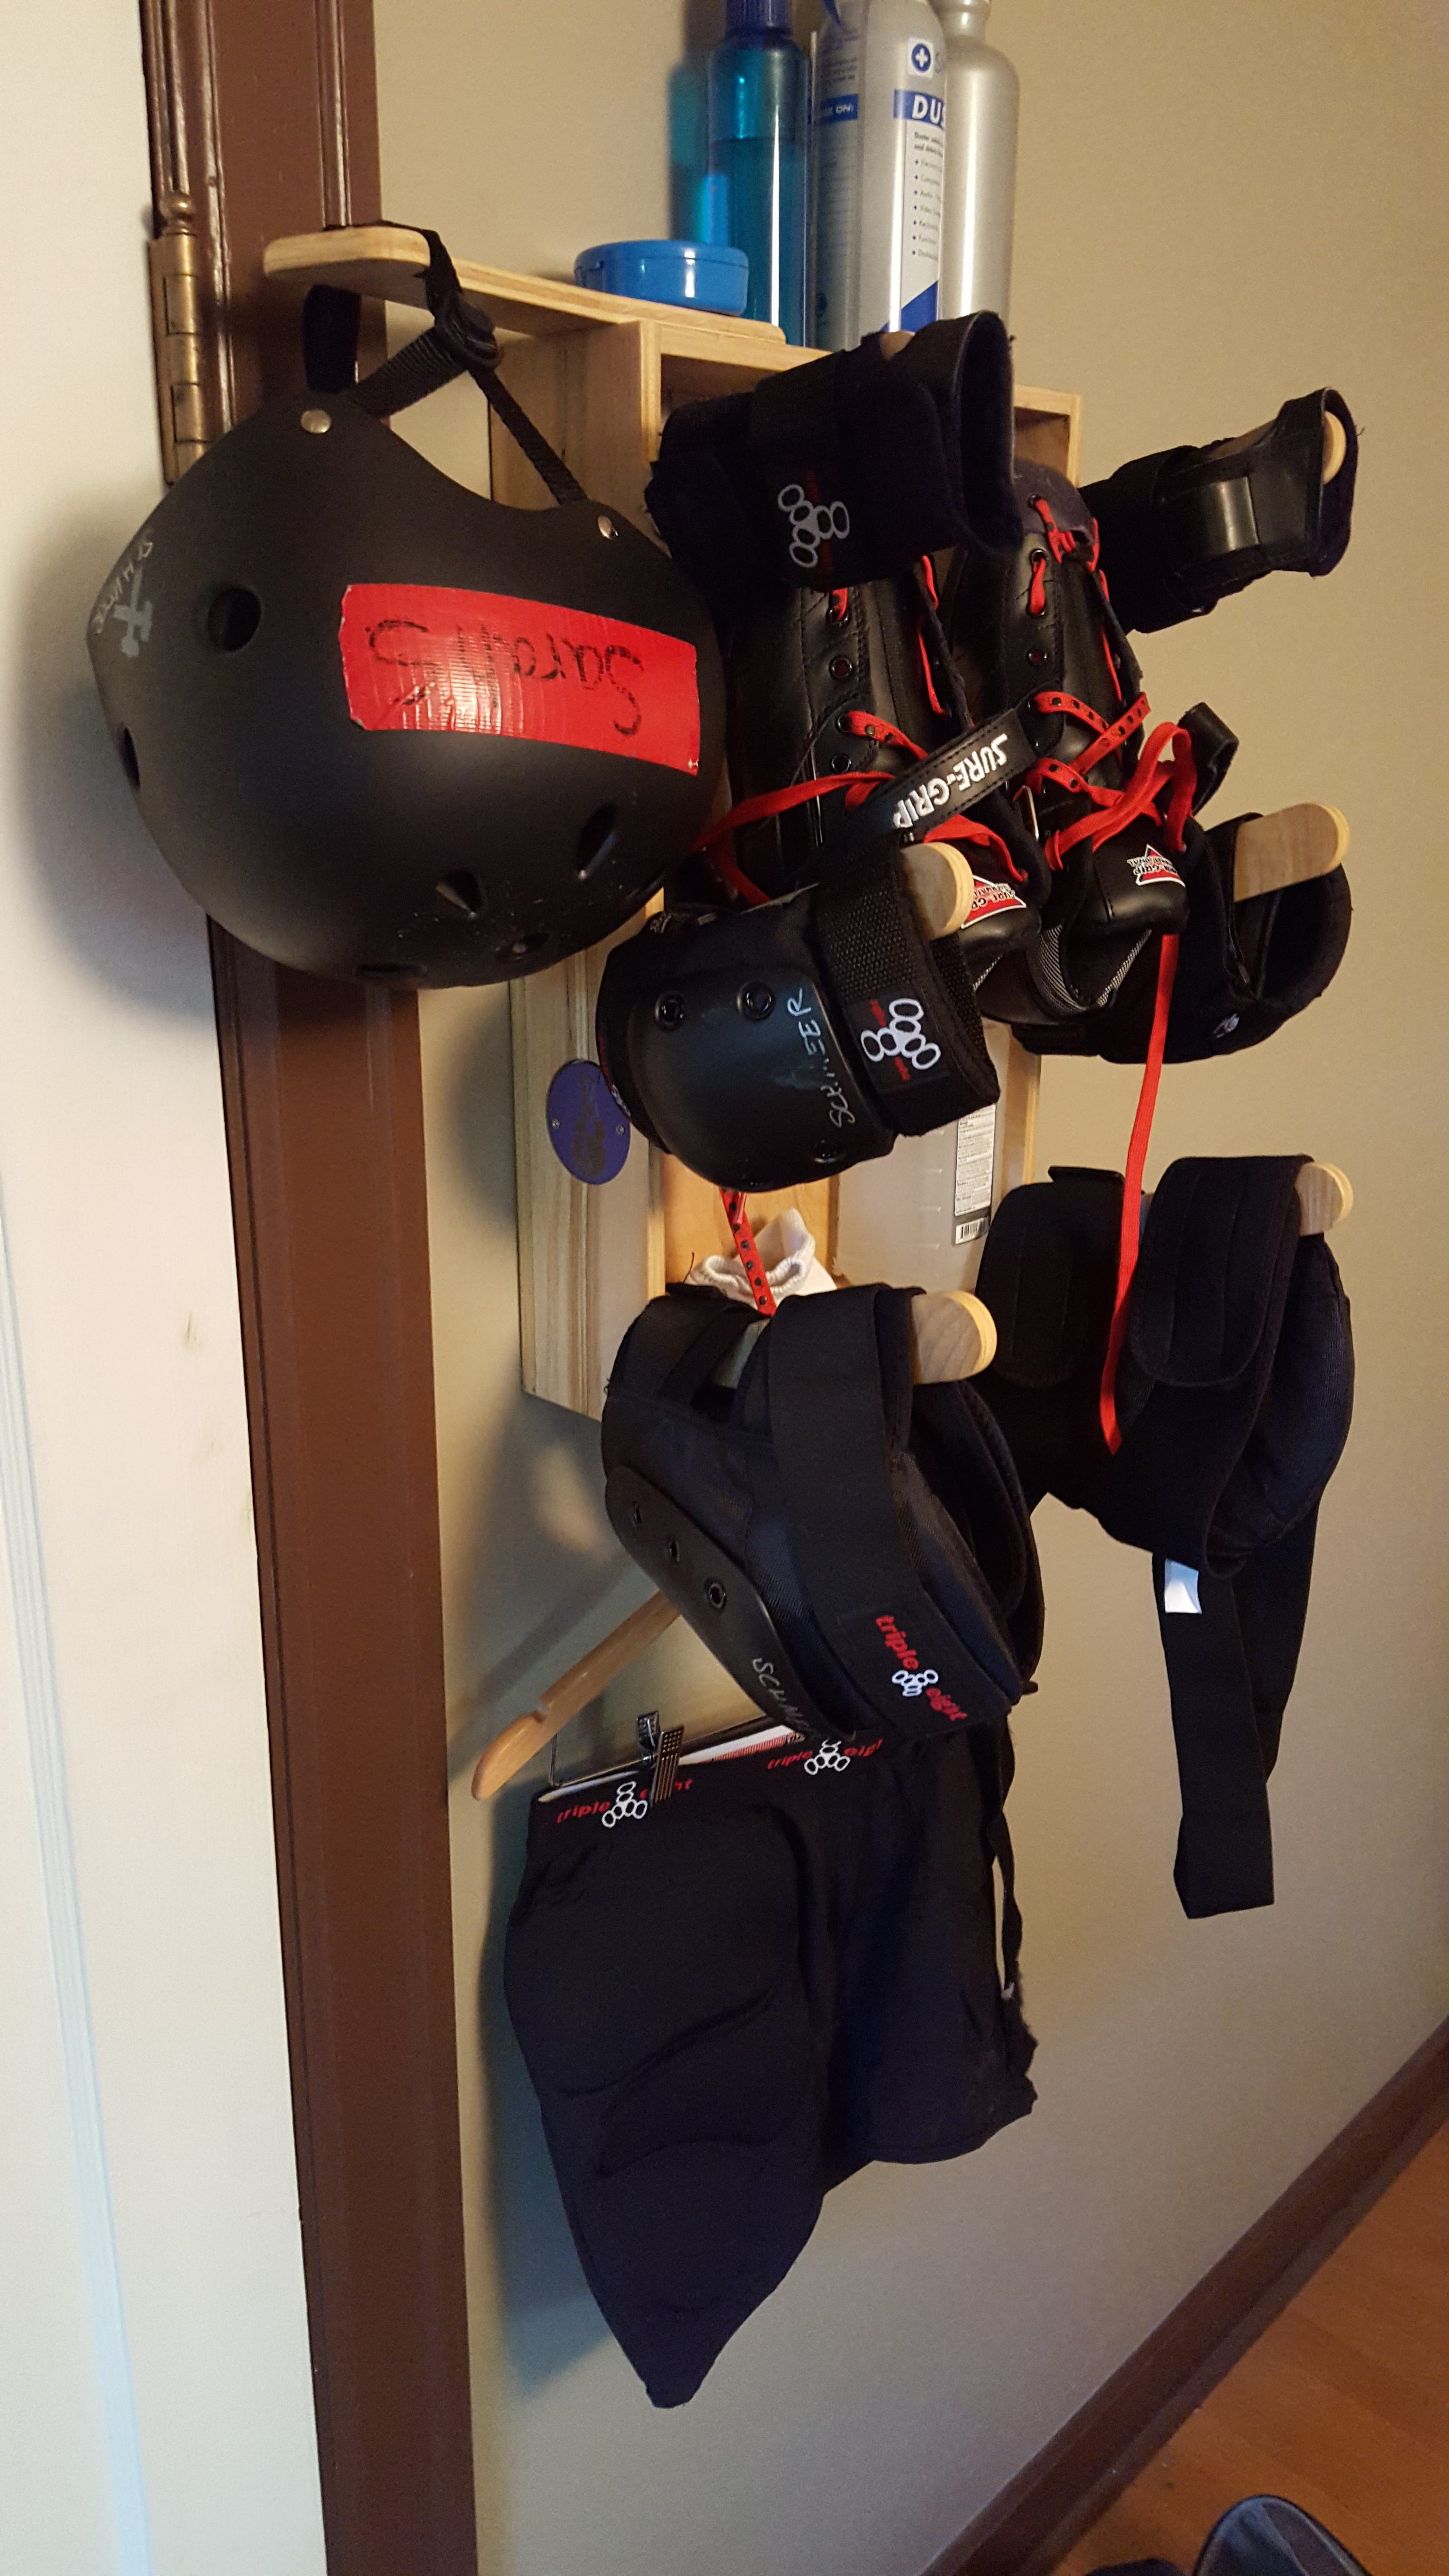
For her birthday, I gave Sara a good-for-one-project coupon. A while later, she redeemed it for a rack she saw online that would hold all the gear it takes to participate in roller derby bouts.
I sketched out a template to use on paper, then did my best to transfer it to some cheap plywood. It came out okay, but I wasn’t getting straight, clean lines with my jigsaw. With some re-jiggering, I sketched out a design in Illustrator that was slightly smaller so that I could then cut the side arms out on the CNC machine.
Using my tetris skills, I was able to arrange the parts out so that I could cut all the parts I needed out of one sheet of 2’x4′ plywood. This way, I could knock out four racks from one sheet of expensive birch ply.
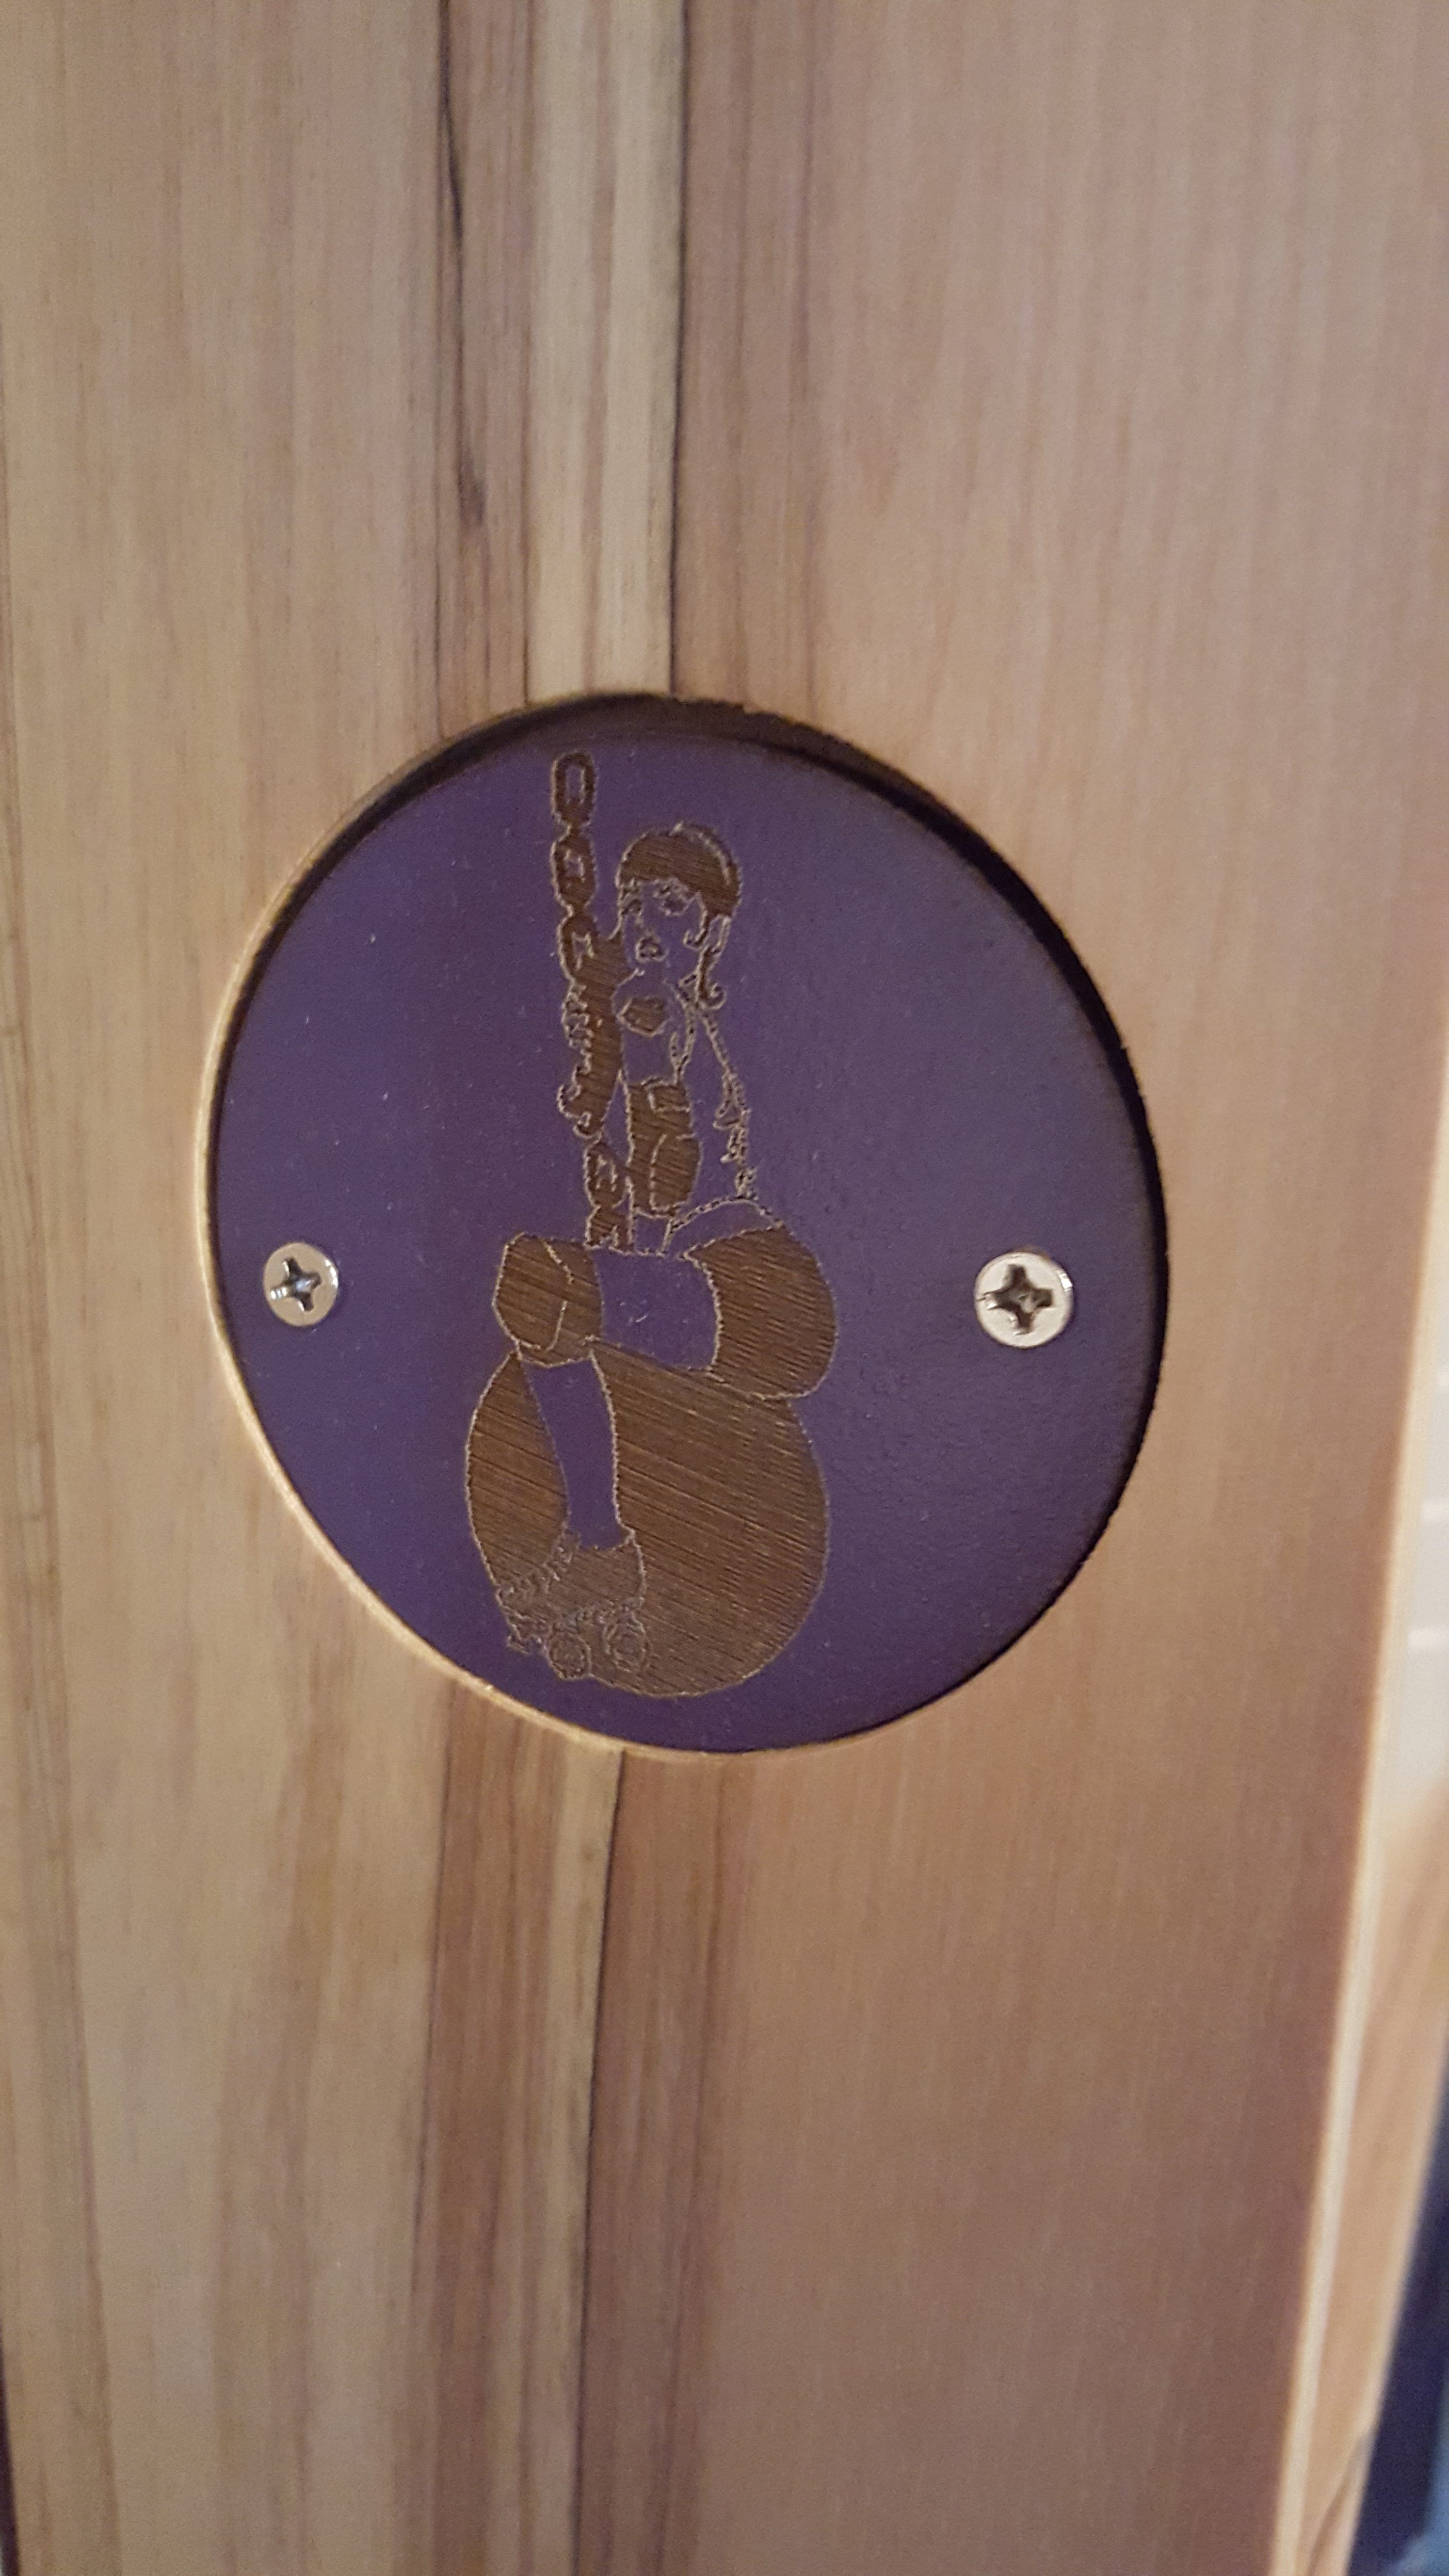
Coated the whole thing in tung oil, then cut logo decals on the vinyl cutter. The smaller ‘wrecker’ emblem logo was too complex for vinyl, so I headed over to Schenk’s to laser-engrave the logo into a disc that would fit into a pocket that was carved out by the CNC. This way, if Sarah is promoted into one of the top-tier leagues, the emblem can be replaced with her current league logo.
For Christmas a while ago, I was trolling around online for gift ideas and stumbled across plans for a moose head jewelry holder over on thingverse. I figured this would be a novel display piece for my friend Kerry, who at the time was using a line of cup-hooks to hold her necklaces.
Cut it out on the laser cutter, gave it an appropriately novel paint job, and gifted it away. After she settled into her new place, she hung it up, and now it’s the most blinged-out moose that’s ever been.
It even has a name (courtesy of Peter): Bulltwinkle.
Ellen’s porch bench got worn out and busted, so I got commissioned to construct a new one. She picked out a style from this page of benches, and I got the supplies and threw one together.
Constructing it meant that I finally had to get around to buying a pocket hole jig, which wasn’t as cheap as I felt it should be (even from Harbor Freight). However, after using it for the first time, I lamented how long I’ve gone without having one. It’s pretty darned handy, and I wish I made the investment sooner.
The bench was finished with a satin polyurethane, which really brought out a rich gold in the yellow pine. Not so much in the dimensional-lumber parts of the bench frame, though.
fig 2: a brief respite
Finished it up by cutting a stencil and spraypainting a requested saying on the back slats of the bench. Came out pretty darned sharp.
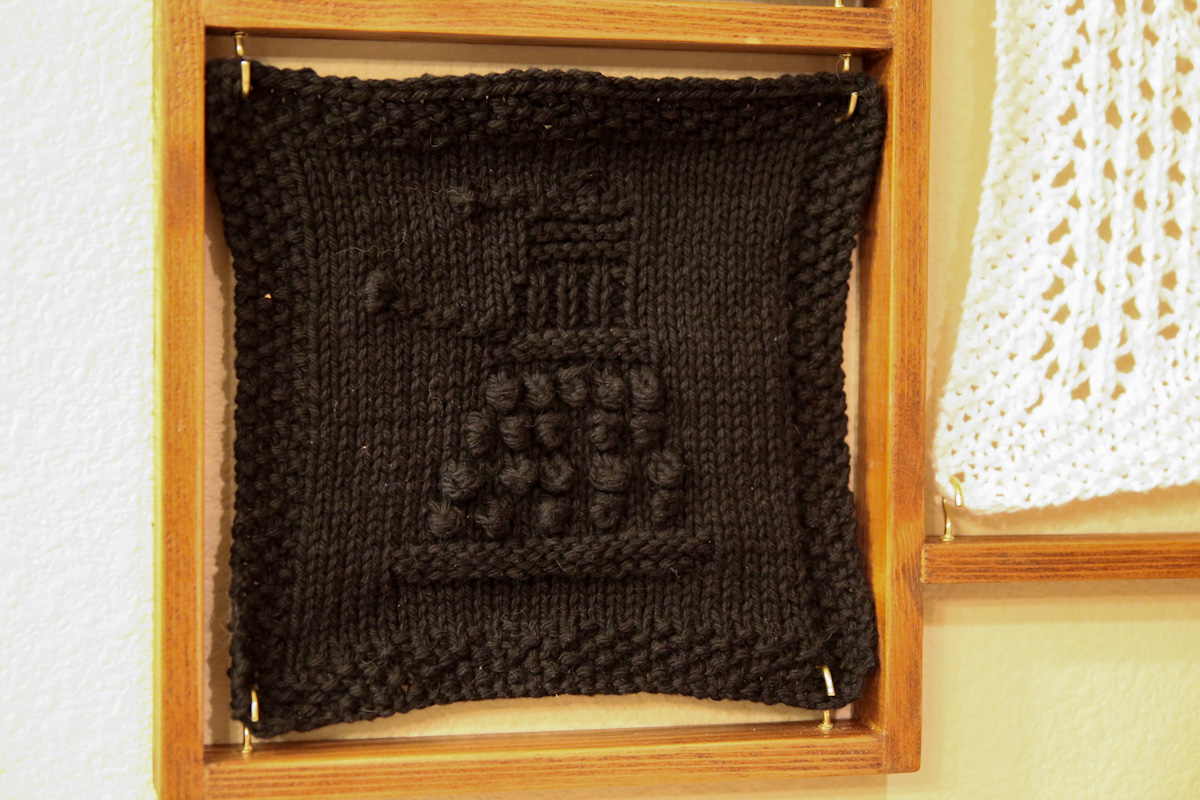
Received a set of custom-knit Who-themed washcloths and soap as a gift from talented knitting friend Cyl. I mentioned that it would be a shame to keep them tucked away when not in use, and she gave me a tip that simple cup-hooks would keep them close at hand, and available for use when needed.
fig 2: “EXTERMINATE!” (click for bigger)
I took the idea one step further, and made a frame for them to sit in. Cup hooks are screwed into a fairly simple Cedar frame.
Detail in the stitching is lost when light strikes it perpendicular to the plane of the frame, so the whole thing placed on a wall in the bathroom where light can strike it from the side.
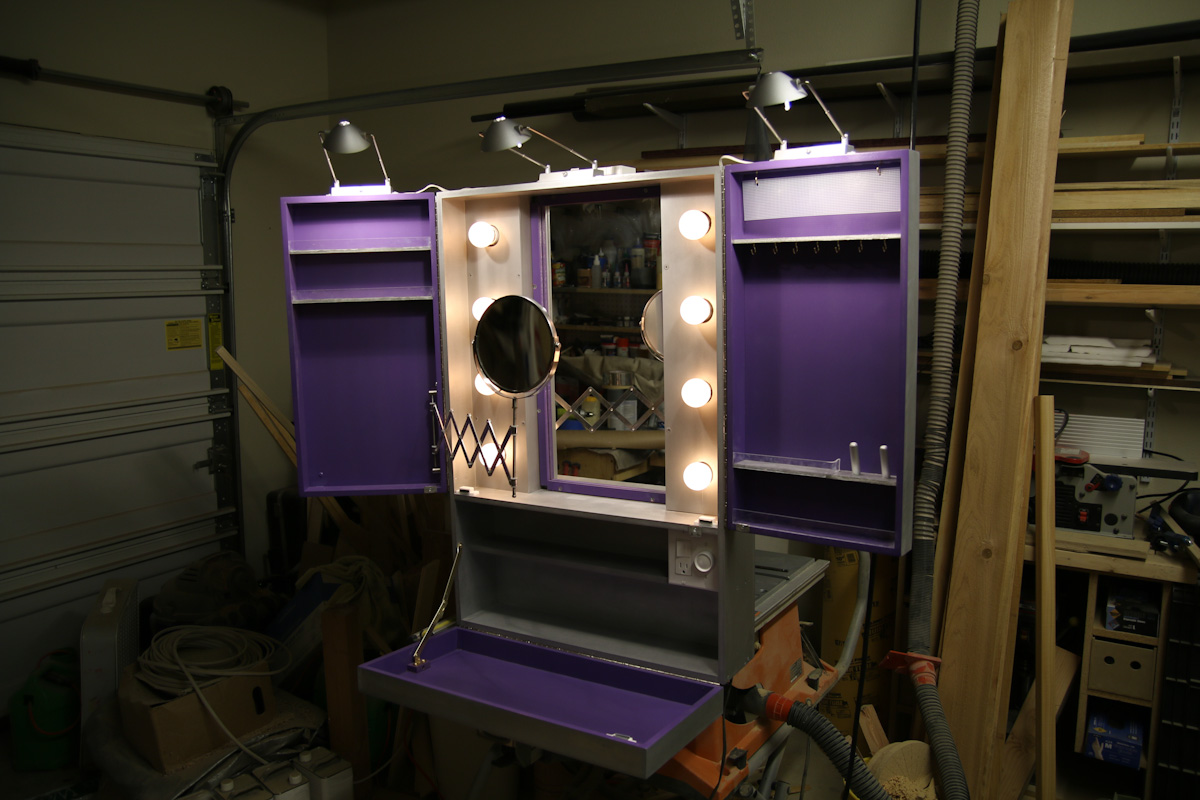
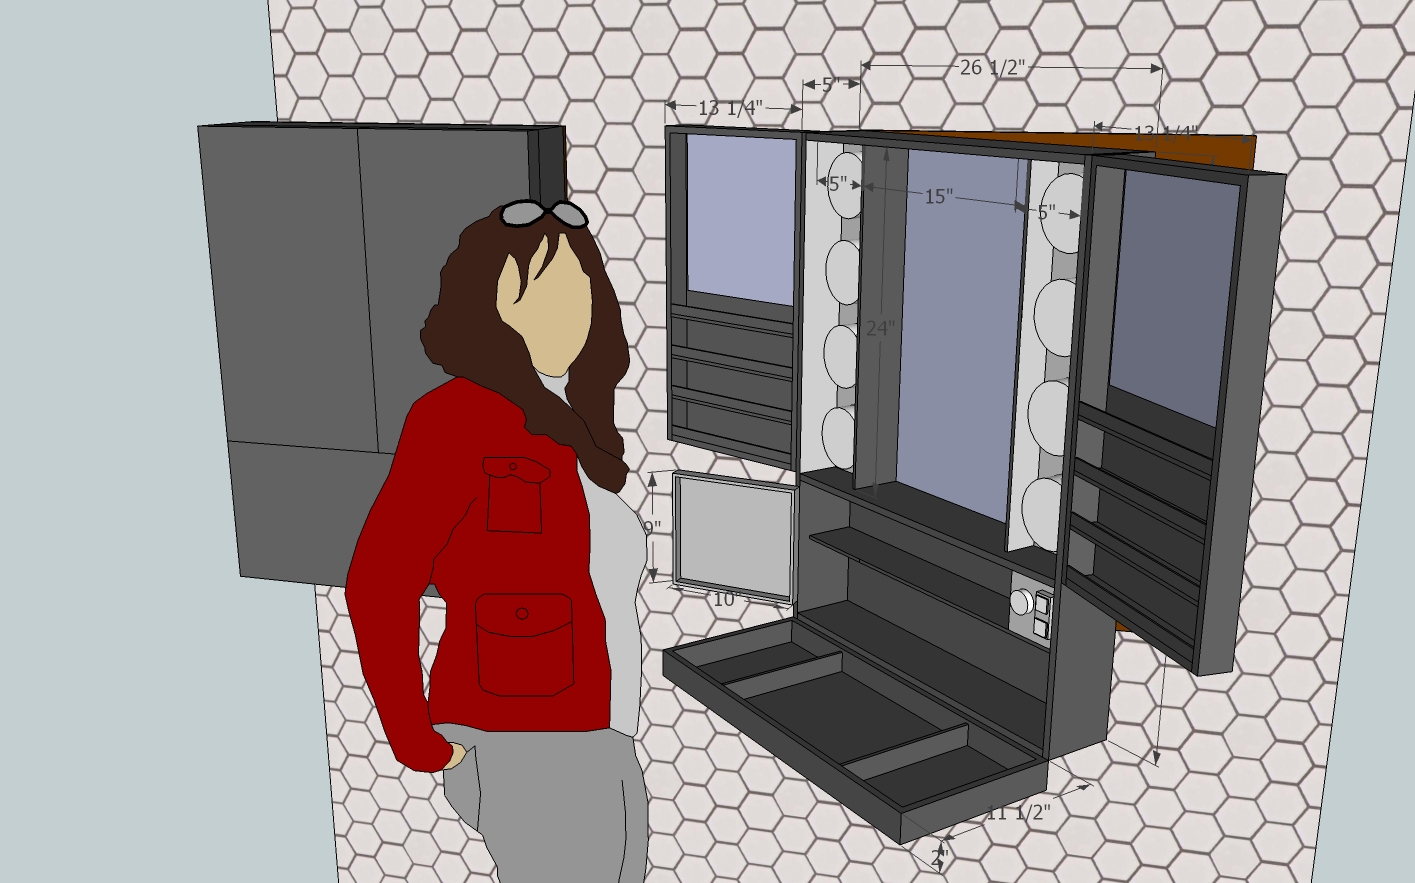
Christmas came and went, and I had a gift idea for a few friends, but not Ellen. She just moved in to a house a few months ago that has a fairly old bathroom that she needs to share with her roommates. I figured I’d dream up a shelf or cabinet she can keep in her room to store makeup and/or jewelry items.
While researching storage solutions online to incorporate into my design, “feature creep” set in, and things started to get out of hand. This was going to be given as a gift, and my knowledge of cosmetics/beauticianry is extremely limited, so I took a ‘shotgun’ approach and decided to incorporate as much as I could. I wanted the design to swing out from the wall, and then fold back away to save space. I wanted to have a large mirror with the rows of bulbs on the sides for even lighting. I wanted to have small shelves to hold small cosmetic items or jewelry. I wanted to have a power outlet in it for a hairdryer or curling/flat iron.
fig 2: My evolving sketchup concept
I made the whole frame out of 1/2″ MDF, which in hindsight was a poor idea. It doesn’t take paint well without a boatload of prep work, and it’s heavy as all get out. I was terrified that the piano hinge wouldn’t hold the whole mess up, but it did.
As a pack-rat, I’ve accumulated quite a few things from Ikea that I don’t use anymore, that I was able to incorporate into the vanity. The magnifying mirror, the main mirror, and the top-down task lighting were all things that I already had laying around. The mirror had to be pulled from its frame and cut down to size. I was reminded all over again how much I hate, hate cutting glass.
Wired up the dimmer to control the mirror lights, the switch to control the top task lights, and the outlet has continuous power.
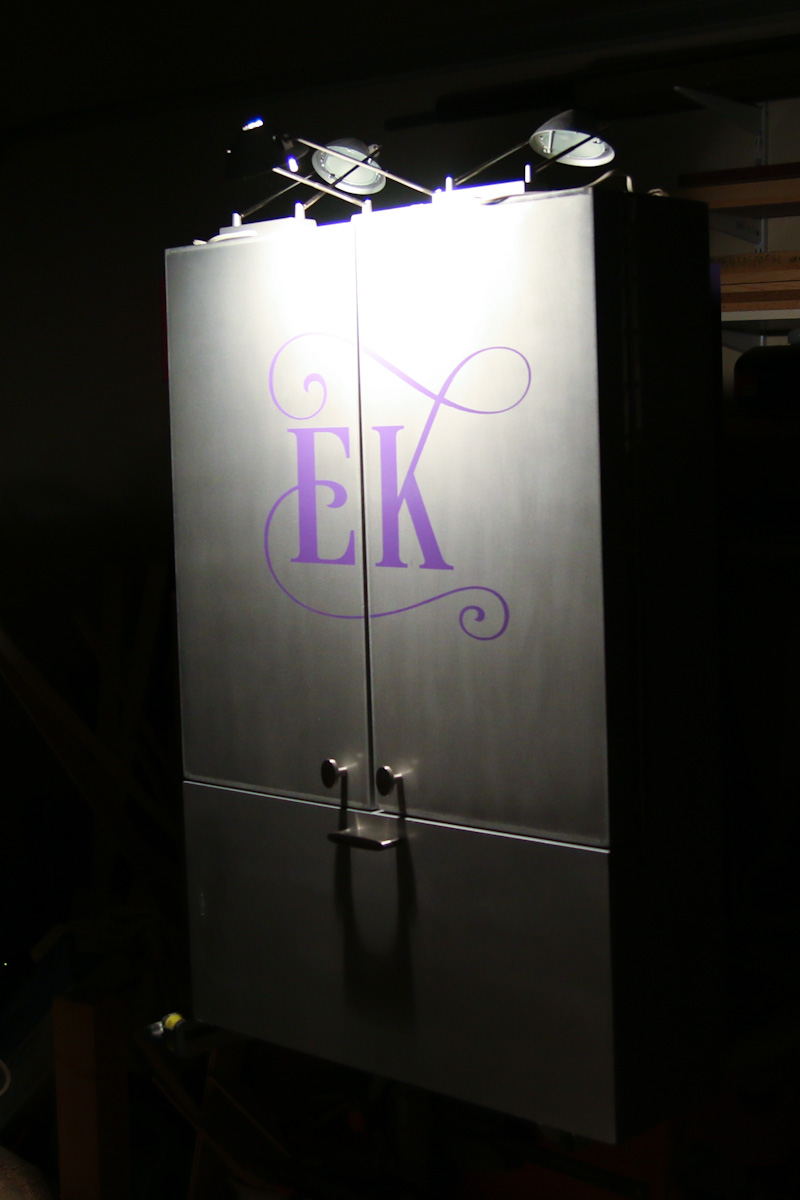
fig 3: Monogram on display
While constructing the vanity, I told Ellen to go to the store and pick out a primary color, and an accent color. She chose sliver as the primary, with purple as the accent. Painting the MDF with a metallic color was quite a process, but I was able to do it. I cut a stencil with her initials in a fancy font, and applied it to the front of the vanity. Looks pretty fancy.
The vanity is fastened to the wall with four 1/4″ lag bolts screwed into the studs. When she moves out, the vanity can be taken down, and the holes should be small enough to fill easily. I had to be super-careful to make sure everything was level when installing, because the doors would open and close on their own if the vanity wasn’t plumb. It’s easy making hinges swing easily with silicone spray or WD-40, but I don’t know if they sell anything in a can that makes hinges stick.
Lessons Learned: In the future, if I have someone pick out colors for a project, I’ll probably tell them that metallics are off limits. I’ll also stick to plywoods for things that hang on the wall, since they weigh considerably less than MDF.
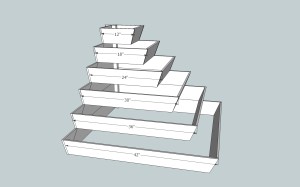
As always, racked my brain on what to get/make mom for Christmas. I eventually settled on a ladder-style planter for her to grow herbs or smaller flowers, but during my research into the different types of planters, I came across a series of terrace-style planters.
I settled on making two planters that had a right-angle corner. That way the planters could either be placed in two separate corners of the garden, or the planters could be secured together side-by-side, to make one larger terraced planter. I didn’t know what mom’s vision for her garden had in store, so I thought versatility would be appreciated.
Drew up some plans in Sketchup, and then found a calculator online to help me get the compound angles I’d need to dial into my miter saw.
Cut the planter sides out of normal cedar fence pickets that were found at the local big-box store, and reinforced the structure with a 2×2 cedar ‘spine’ at the right-angle corner. I attempted to screw everything together, but the compound miter angles made it fairly difficult; I wound up putting long nails into my pin nailer, and just nailed the heck out of it.
My initial design had two more terraces, but before I cut the boards I ran out to the car with the tape measure. Two of the four terrace planters would fit in my car for transport on Christmas day. Any more terraces, and I would have to do assembly there on Christmas day.
Lessons Learned: Compound miters are really easy if you keep them to just one corner. Also, if the cedar fence pickets were a little thicker, I probably wound have tried to use some kind of spline to help keep everything together.
I didn’t really think about it until the planters were done, but there’s a lot of wasted space in this style of planter that needs to be packed with fill dirt. I feel kind of bad that in giving my mom the planters for Christmas, I also inadvertently got my old man an extra chore.
I made an end-grain cutting board for my brother a couple years ago, and I decided to make another board this year for my uncle. But instead of end-grain, I thought I’d keep it a little simpler and just go with a normal edge-grain cutting board.
I had a Hickory board that I picked out a year or two ago that I was going to turn into bow staves, so it had straight grain and was knot free. I also had a Purple Heart board kicking around, so I thought I’d add in a few strips of that to give it a nice contrast.
fig 2: Dynamite with a laser beam
Got the cutting board glued up and planed, then hauled it over to Schenk’s for a trip through the laser cutter.
Brought it home, then started adding coats of plain old food-grade mineral oil. Rubbed on a coat, let it sit for a few hours, then added another coat.
After a few days of adding a coat of oil every so often, I wrapped it up and gave it away as a gift. With the monogram on one side, it can be used as a serving tray, and food or other items can be cut on the backside.
Lessons Learned: Edge-grain cutting boards are much easier than end-grain, and I not counting glue-up time, I can knock one out in a couple hours. I just need to expand my repertoire of things to laser-engrave into them.
 Saw someone online made an Aperture Science Labs test chamber sign, and figured I could do it too. Cut the graphics out on the vinyl cutter, and applied it to TAP Plastics LED diffusion material, and put plexiglass in front of that (the LED diffusion material is fairly thin). Made a wood box, and burned up a whole five-meter roll of LED tape on the inside.
 Problems arose, however, when I figured that a 1A power supply would handle all that LED tape. After about 10 minutes, the power supply got really hot, and I finally did the math and found out that I’d need at the minimum a 3A power supply.


 Cut it out on the laser cutter, gave it an appropriately novel paint job, and gifted it away. After she settled into her new place, she hung it up, and now it’s the most blinged-out moose that’s ever been.


 Drew up some plans in Sketchup, and then found a calculator online to help me get the compound angles I’d need to dial into my miter saw.
